1.
2.
3.

Read More..
NY Times article
Hi Everyone,
Everyone should read this article that appeared in the NY Times today:
http://www.nytimes.com/2012/01/31/us/for-soldier-disfigured-in-afghanistan-a-way-to-return-to-the-world.html?pagewanted=1&_r=1&adxnnlx=1328036424-Ao6kYkyXBRJ5NXdbC0e/6Q
VW
Read More..
Everyone should read this article that appeared in the NY Times today:
http://www.nytimes.com/2012/01/31/us/for-soldier-disfigured-in-afghanistan-a-way-to-return-to-the-world.html?pagewanted=1&_r=1&adxnnlx=1328036424-Ao6kYkyXBRJ5NXdbC0e/6Q
VW
Moulding Samples
When I last posted on my expanding moulding plane shelves the better part of a year ago, I mentioned that I had created a smaller shelf for storing short samples of the mouldings cut by the various planes. Ive been slowly adding to these samples and since I find them very useful, I thought I might post about them.
Heres a shot of the almost full shelves:
That lower, center shelf holds the moulding samples:

I make these out of scrap 1x2 pine, and find these useful for several reasons:
1. They allow me to see the positive moulding profile, rather than the "negative" profile on the plane itself. Its funny how different these two versions of the same profile can be - especially for a profile that I havent used before. I alchoices think I know what the moulding will look like, but somehow my brain never sees it quite right. It works out much better to just work with the positive version.
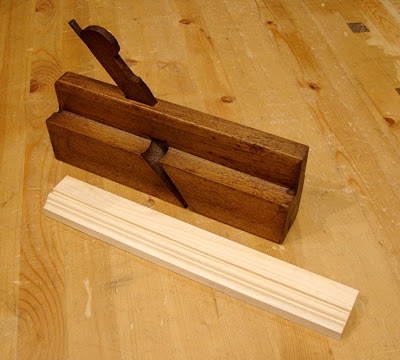
2. It gives me a three dimensional moulding with which to play. I can see how the light and shadows change in various orientations. The shadow lines on a piece of moulding are a major aspect of the moulding, and they can look very different depending on where the moulding is used. With the sample, I can very easily try the moulding "right-side-up" or "up-side-down" (of course these terms are pretty meaningless - but I think you get the idea). When Im deciding on a moulding for a piece, I pull out the samples and try them out in their final position. Visualizing is good, but actually seeing it is better.
3. I can stack the samples to see how they would work in building up a compound profile. This isnt perfect, as each moulding would not have to be stuck on a 1x2, but it works well enough to get a good idea of how they would look combined.
4. I use the back of the sample to record information about the plane. I write/draw the makers mark, the owners marks, any indicated sizes, and anything else stamped, carved or written on the plane. Then I record the name of the profile, which is sometimes a challenge. I also make note of any quirks in the use of the plane, or reminders to sharpen the iron. Besides being interesting, these notes help me locate the plane in my growing collection.
In the future, Id like to include the approximate age of the plane on the back of the sample. And of course, I will probably need to make another shelf for the samples, as I underestimated how much room I would need... But what else is new?
Read More..
Heres a shot of the almost full shelves:
That lower, center shelf holds the moulding samples:
I make these out of scrap 1x2 pine, and find these useful for several reasons:1. They allow me to see the positive moulding profile, rather than the "negative" profile on the plane itself. Its funny how different these two versions of the same profile can be - especially for a profile that I havent used before. I alchoices think I know what the moulding will look like, but somehow my brain never sees it quite right. It works out much better to just work with the positive version.
2. It gives me a three dimensional moulding with which to play. I can see how the light and shadows change in various orientations. The shadow lines on a piece of moulding are a major aspect of the moulding, and they can look very different depending on where the moulding is used. With the sample, I can very easily try the moulding "right-side-up" or "up-side-down" (of course these terms are pretty meaningless - but I think you get the idea). When Im deciding on a moulding for a piece, I pull out the samples and try them out in their final position. Visualizing is good, but actually seeing it is better.3. I can stack the samples to see how they would work in building up a compound profile. This isnt perfect, as each moulding would not have to be stuck on a 1x2, but it works well enough to get a good idea of how they would look combined.
4. I use the back of the sample to record information about the plane. I write/draw the makers mark, the owners marks, any indicated sizes, and anything else stamped, carved or written on the plane. Then I record the name of the profile, which is sometimes a challenge. I also make note of any quirks in the use of the plane, or reminders to sharpen the iron. Besides being interesting, these notes help me locate the plane in my growing collection.
In the future, Id like to include the approximate age of the plane on the back of the sample. And of course, I will probably need to make another shelf for the samples, as I underestimated how much room I would need... But what else is new?A cabinet fit for a cavity
On a project in Oak Harbor, Ohio, Ive constructed a cabinet to fit a wall cavity. The cavity is a full 6" deep, so using 1x6 for the box, and then making a face frame out of 1x4 was a snap. The real issue was, the cabinet doors that were ordered were quite a bit smaller than the hole, so construction needed to be right on the money! Here are pics of the installation...
.jpg)
Ive used shelf standards inside, to give the owner adjustable shelving.
.jpg)
Ready for paint!
.jpg)
Read More..
.jpg)
.jpg)
.jpg)
.jpg)
.jpg)
MBR Headboard Update


Check back tomorrow for finished photos and to see how I did it!
Shop Lighting
Last year I decided I wasnt happy with the lighting in my shop. When I first started out, I went for bright and cheap. Then I went for brighter. Then I went for brightest. I ended up with a ceiling full of florescent "shoplites". Plenty bright - plenty cheap.
For a long while, all was right with the world. Then something happened - I discovered the power of shadows. Directional light. Its a whole new world.
What I had was very bright, but very flat. No shadows. Time for an overhaul. I changed to halogen track lighting. And after hours on top of ladders, I came up with a set-up I really like - most on the ceiling, but one smaller track on the wall opposite the bench. I tried to balance general area lighting with the needs of specific work areas. Its not as bright, in an overall sense, but it is decidedly easier on my eyes, and even my mood. Details really stand out under the directional light. Plane tracks for example - where the florescent lights washed out the surface of the board, the directional lights really make the tiny ridges jump into relief.
Here are three sets of before (left) and after (right) photos. They dont really do it justice, but I think you can get a sense of the difference (especially if you click on them to make them larger). And, as a secret bonus, since they were taken months apart, its also kind of fun to see how many differences there are in the shop details - at least for me - it reminds me of something in the old "Highlights" magazines they had in my doctors office when I was a kid...


Side Note: in the third pair of photos you can see the sole survivor from my pre-neanderthal days. Even though it has not been plugged in for over three years, I have hung on to the bandsaw for several reasons:
1. It was my first large powertool, and as such has residual sentimental value.
2. I dream of building a small wooden boat - and resawing that much wood might be too much even for me - I suppose at some point idealism does connect to pragmatism...
3. It serves as a handy rack for various objects, such as: the full face shield and ear protection that I no longer need to wear, the tool rests for my spring-pole lathe, and the breast bib for occasional use with the shavehorse.
Read More..
For a long while, all was right with the world. Then something happened - I discovered the power of shadows. Directional light. Its a whole new world.
What I had was very bright, but very flat. No shadows. Time for an overhaul. I changed to halogen track lighting. And after hours on top of ladders, I came up with a set-up I really like - most on the ceiling, but one smaller track on the wall opposite the bench. I tried to balance general area lighting with the needs of specific work areas. Its not as bright, in an overall sense, but it is decidedly easier on my eyes, and even my mood. Details really stand out under the directional light. Plane tracks for example - where the florescent lights washed out the surface of the board, the directional lights really make the tiny ridges jump into relief.
Here are three sets of before (left) and after (right) photos. They dont really do it justice, but I think you can get a sense of the difference (especially if you click on them to make them larger). And, as a secret bonus, since they were taken months apart, its also kind of fun to see how many differences there are in the shop details - at least for me - it reminds me of something in the old "Highlights" magazines they had in my doctors office when I was a kid...


Side Note: in the third pair of photos you can see the sole survivor from my pre-neanderthal days. Even though it has not been plugged in for over three years, I have hung on to the bandsaw for several reasons:1. It was my first large powertool, and as such has residual sentimental value.
2. I dream of building a small wooden boat - and resawing that much wood might be too much even for me - I suppose at some point idealism does connect to pragmatism...
3. It serves as a handy rack for various objects, such as: the full face shield and ear protection that I no longer need to wear, the tool rests for my spring-pole lathe, and the breast bib for occasional use with the shavehorse.
Spoons stay tuned
Hello Again,
Ive been working on making spoons in my shop for about the past 6 weeks and I must say that Ive really enjoyed it. Its very satisfying to make something yourself and making a spoon seems to bring a certain contentment with it.
Here is a photo of a spoon I just finished. This one is out of American cherry:
And here are several others out of (l to r): maple, black walnut, and cherry:
Ive been making these out of scrap lumber and while this wood is harder than unseasoned wood, it produces a fine, strong spoon that works well in a kitchen environment.
Ill be working on another spoon later this week and Ill take you through this step by step so if you like, you can make your own.
More later,
VW
Read More..
Ive been working on making spoons in my shop for about the past 6 weeks and I must say that Ive really enjoyed it. Its very satisfying to make something yourself and making a spoon seems to bring a certain contentment with it.
Here is a photo of a spoon I just finished. This one is out of American cherry:


Ill be working on another spoon later this week and Ill take you through this step by step so if you like, you can make your own.
More later,
VW
Subscribe to:
Posts (Atom)