I gave some thought to making another till for my bench saws, or maybe some kind of cabinet, but in the end I decided to stick with the hanging panel idea. One thing I really like about tool holding panels is how easy it is to see and get at everything. Plus, I like how it looks; a kind of "shop art".
The new panel would hang from the French cleat system I use in my shop. Basically, this works by having two boards, each with 45° angles, that interlock. One board is attached to the wall, and the other is attached to the back of whatever you are hanging. In my shop, I have a continuous cleat running along the walls. This makes it very easy to hang and rearrange all sorts of things: panels, tills, shelving units, miter boxes, postdrills etc.
One thing that needs to be addressed is how to attach the corresponding cleat to the unit being hung. Most things hung in my shop simply have the cleat glued and screwed to the back of the frame at the top. This is long grain to long grain, and therefore wood movement is not an issue. Sometimes the cleat must be attached cross grain, and here wood movement could be a problem. On relatively narrow cross grain joints, such as the single 1x12 panel that holds my braces, I dont worry too much about it. I just screw it on and only glue it in the middle. Larger cross grain joints, such as the one on this new saw panel, are a different story.
To get the width I wanted for the new panel, it would be made from three 1x10 boards. If I used glued butt joints to join the boards into a single 27 inch wide slab, movement could become fairly significant. If I then just screwed the cleat across the back, the board would most likely split as it tried to move. I could have used slotted holes for the screws, but instead I decided to just use unglued T&G (tongue & groove) joints and attach each board to the cleat separately. This choice, each board is free to expand and contract independently, while the T&G joints keep everything aligned and looking good - i.e. no wall visible through gaps between the boards.
The first step was to joint the edges so that they would be nice and straight. This picture might be a little confusing. I jointed the boards on edge, and then lay them flat to see how they fit. I wasnt using the #8 jointer to plane the faces (although I could have if I wanted to - "Breaking the law! Breaking the law!").
 To make the T&G joints I used my Stanley #49. It has an eccentric swinging fence that allows it to cut both the tongue and the groove. Originally, it would have come with an extra wide iron for use on thicker boards. This would allow it to remove all the wood to the right of the tongue. I dont have that, so the extra "tongue" will have to be removed next. I wanted the tongue offset to the backside of the board thickness to allow room for forming a bead along the edge.
 To remove the leftover wood, I used my small rabbet plane. I set it for a thicker shaving to speed things up.
 Then it was time to make the side beads:
 After that, I cleaned up the show faces with my #3 smoother. Its amazing how much better the wood looks after the scalloped machine planing marks are removed.
 As a side note, it was while using those last four planes that I shot the images for the Planes and Shavings post.
This next sequence shows how I make my French cleats. Its funny, but I remember how much of a challenge this was the first time I had to do this after getting rid of all my power tools. I just didnt have my "hand tool brain" going strong yet. Really, its quite simple and rather easy.
First, with a marking gauge set to the thickness of the board, I scribed a line down one face of the board. I also put pencil marks across the top to make it easier to see the bevel as it develops.
 Then I remove the bulk of the waste with a drawknife. You could also do this with a scrub plane, or even a jack plane; but they would both be slower than the drawknife.
 Finally, I cleaned things up with a jack plane. The secret is to keep the bevel developing evenly as you go. Its not hard once you get the knack, and you could do any bevel angle you want the same choice.
 After the bevel was complete, I attached the cleat to the top rear of the panel. I chose to use finish screws near the center of each board. I used a 1/4 inch forstner bit in my hand drill to create the counterbore (which I later plugged).
 After boring pilot holes with another hand drill I drove the screws with a 6" swing brace. I love using these small braces for driving screws. They provide plenty of torque, are the original "variable speed" driver, and have a great sense of feedback that beats any cordless drills clutch feature. The smaller size allows for quicker driving.
One problem I ran into was sinking the screws too deep for the driver bit to reach. I had to get creative. In the end, I filed off the tang on a triangular file until it matched the square driver hole in the screws, and then used a pair of Vise-Grips as a 90° handle. Worked great.
 And heres the new panel in place; looking spiffy - but empty:
 I spent the next few weeks making various holders for the saws. Nothing tricky, just a lot of finicky work getting the fit just right.
 And heres the panel with the saws:
 I quite like it - makes me happy every time I look at it. Im also happy to be finished. It took a lot longer than I was planning.
Well, its mostly finished anychoice. I saved one spot next to the Lie-Nielsen dovetail saw for an old Disston dovetail saw I am going to finish fixing at some point. I started working on it over a year ago, but it turned into a disaster of saw plate flattening: "Just one more tap of the hammer... tap... hmm... maybe... tap... No!... Arrgh!" Its hopeless, and Ill need to completely replace the saw plate - later.
 Here are all the rough cut pieces laid out. The top (closest to the bottom) will be resawn. The legs are 12/4x9" and the aprons are 12/4x9" as well and will be resawn to final dimensions.
 Ive made this piece before so I am familiar with it, but still need to be careful. The finish this time will be different as well, per the customer request, so you may seem some questions about that.
 Bad Axe Tool Works- what more can I say? Simply put I find them to be the finest hand saws on the market today. I own an 18" rip saw and a 16" cross cut that you know if youre a regular here I use on a daily basis. I think theyre incredible tools with the highest craftsman ship available but can understand why some beginners may have shyed achoice from them. Lets face it- these are big saws! For anyone looking for a smaller scale back saw or for someone who couldnt imagine working with the larger scale saws presently being manufactured, Bad Axe is offering both a 12 and 14" saw due out in late March.Buyers can watch for optional fasteners, with standard filings for the 14” saw at 11-12 tpi rip and 12-13 tpi x-cut. The 12” saw’s standard filing will be 12-13 tpi rip and 13-14 tpi x-cut. If these specs dont suite your work then Mark will happily custom file per customers request. Other Bad Axe news can be found on the new Bad Axe FaceBook page.
 But it is very necessary and something that has to be done. I try to turn as smooth a surface as possible and most of the time I succeed. But some woods are hard to turn and in the case of the cumaru plate in the photo, the curvature of the surface and the interlocking grain make achieving a very smooth surface with a turning chisel rather difficult. So I got out my trusty hand drill and a 3" circular sanding disc and went to town on the plate:
 The cumaru plate has special challenges-the interlocking grain and the corners. When the plate is spinning on the lathe I cant see the corners clearly. They look like shadows and with the curve on the inside of the plate extending all the way to the corners, its difficult to know if the sanding paper is making contact with the wood. So I take a piece of chalk and color in the corners so when its spinning I can see the surface:
 I turned on the lathe and ran it up to 600 rpm and started sanding, first with a 100 grit wheel and then with a 180 grit wheel and that got most of the deep scratching off the surface, but not quite all of it. So I turned off the lathe and locked so it wouldnt move and sanding it while the plate was stationary. This got off the rest of the scratching and left a smooth surface.
 The color in this is really rich and beautiful. Cumaru wood is always worth the effort.
 My intent in turning the plate in this manner was to take advantage of the chocolaty character that walnut seems to have. Turned wooden items made from black walnut have a certain warm, undefinable quality to them that makes you want to pick them up and run your hands over the surface. I was trying to emphasize that in this turning and I felt that interior rim detracted from that. So off it came. Heres a photo about 5 minutes later:
 I think it looks better this way. And so I sanded it for a few minutes and then wiped it down with mineral spirits and this is what it looked like:
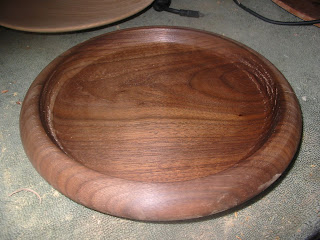 Lastly the white ash plate-this happy fellow doesnt require a lot of heavy sanding or re-shaping. Ive sanding this up to 180 grit at this point and wiped it down also with mineral spirits and here is the color of this plate:
 Now all of these plates are going to need more sanding up to 400 grit before we get down to oiling them. The walnut and ash plates can be completed on the lathe. The cumaru plate will have to be hand sanded to completion as doing that on the lathe could be dangerous.


